PG
Microfluidic Reservoir Kit and Connectors
When implementing microfluidic devices as tools for chemical or biological analysis, transferring external reagents into microfluidic or lab-on-a-chip devices is needed.
There is no good solution so far. A traditional way is that researchers use a syringe pump to push external reagent into a microfluidic chip through capillary tubing.
The traditional way has the following disadvantages:
-
First, capillary tubing needs to be filled with the reagent first in order for reagents to enter microfluidic devices, which causes waste of reagents and weakens the microfluidic advantage of low reagent consumption;
-
Second, bubbles are easily trapped in the capillary tubing. To remove bubbles in capillary tubing, a large amount of reagent needs to be used. The bubbles trapped in capillary tubing also could cause interference of detection when entering detection area in microfluidic devices.
-
Third, in this connection method capillary tubing is usually not disposable. The tubing needs to be washed between runs with different samples by a large amount of cleaning solution. Some researchers use home-made reservoirs and connect them to microfluidic devices. This method requires specialized skills, training, and tools, sometimes additional fabrication steps such as gluing, ultrasound welding, which are labor intensive. Often these connections are fragile and easy to have leakage issues.
PreciGenome offers various solutions with a wide range of volume for your microfluidic reservoir problems.

Reservoir Connectors(230ul)

Reservoir Kit (15ml)
Reservoir Kit (1.5/2ml)
Microfluidic Reservoir Kits
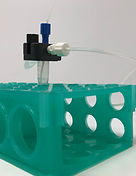
PreciGenome also offers air-tight reservoir kit, which allows pressurization of standard lab tubes for microfluidic applications.
The kit includes a microfluidic adapter allows the use of Falcon tubes in microfluidic systems. It uses standard 1/4”-28 fittings, interfaced with any pressure source. It's so easy and convenient to build a reusable microfluidic reservoir system.


Diagram of typical connection for fluidic reagent reservoir kit
Four different versions are available:
-
1.5ml/2.0ml tube
-
15 mL Falcon tube
-
50 mL Falcon tube
-
100ml or larger volume, GL45 thread bottles


PreciGenome Reservoir Connectors
PreciGenome offers a “plug-and-play” reservoir connector eliminating most of these issues. It allows for easy connection. No special training and tool are required. The connectors are injection molded by PC material, compatible with most reagents for microfluidic applications. One end of the connector can be inserted to an inlet/outlet of a microfluidic PDMS chip with a diameter of 2-3mm hole. The other end is compatible with male luer slip connector, which can connect to an external pressure source directly standard luer fitting connection. A single connector can hold up to 200ul of reagent. The volume can be easily increased with a luer syringe plugged into the reservoir connector. The connector also has volume tick marks for reagent volume measurement.
The reservoir connector is low-cost, disposable, and easy to use. It is robust enough to hold pressure up to 35psi without leakage. The reservoir connector is dead volume free, which maximizes your reagent usage. The connection of reservoirs to microfluidic chips can be assembled in a matter of seconds. This plug-and-play reservoir connector is a versatile solution to the world-to-chip interface problem and can be widely applied for microfluidic technology implementation.


Guide to use reservoir connectors
Required accessories:
-
ID 1/16”silcone tubing;
-
1/16”barb to Luer lock connector;
-
1/16 barb to Luer slip connector;
-
Precigenome reservoir connectors.
Preparation:
a. Cut silicon tubing to the length which fits your application. Connect one side of the silicone tubing to the barb side of the 1/16”barb to Luer lock connector and the other side to the bard side of the 1/16” barb to Luer slip connector. User the Luer lock side to connect with the pressure controller.
b. Make holes in a PDMS chip with a proper hole puncher. 2-3mm holes are ok. (Diameter 3mm is optimum).

1. Insert Precigenome reservoir connectors into pre-punctured holes (diameter 2-3mm, opitimum at 3mm) in a PDMS chip
2. Load reagents into the reservoir by a pipette
3. Use the Luer lock side to connect with the pressure controller. Connect the reservoir connector with Luer slip lock connector and make sure the connection is tight.


When the Precigenome reservoir connector is used as a reagent reservoir, a maximum of >200uL of reagent can be loaded. If users want to load more reagent (up to 1 mL), the connector can be connected to a disposable syringe (1mL syringe) as shown in figure. Users need to remove the plunger from the syringe. Users use the Luer slip lock of the syringe to directly connect to the reservoir connector. After loading reagent in the barrel of the syringe, the top of the syringe can be sealed by a 1/16 barb to Luer slip connector where the Luer slip lock side is sleeved by a rubber seal.
4. Turn on the PG-MFC Pressure Controller to apply the pressure onto the reservoir connectors. Ready to run.
(Other pressure controllers are also compatible)

